Sunday, January 29, 2012

Winter Squash: A Study in Still Life Part III

Well, here it is.  The final installment of my winter squash series.  Have you had enough?  I still have a few squashes waiting patiently in my basement for their turn to play a role on our dining table.   Winter in Wisconsin can become a little tiresome, in more ways than one.  I am grateful for the beautiful and nutritious abundance that winter squash provides us.  Finding ways to get creative with this vegetable is important to help us enjoy all it has to offer through our long winter months.  (If you have had enough of squash and aren't interested in more inspiration, please skip to the end of this post for other important information.)


The recipe I want to share is adapted from "One Bite at a Time - Nourishing Recipes for Cancer Survivors and Their Families" by Rebecca Katz.  Rebecca is a nationally recognized expert in using food as medicine.   Her book is inspiring and filled with recipes that are beneficial for everyone.  What I love about this recipe is not only that it is balanced and healthy, but also that it is extremely versatile and can be easily adapted according to what you have available in your pantry and what is in season.

Seasonal Couscous


Squash:
1/4 tsp ground cumin
1/4 tsp ground coriander
1/4 tsp sea salt
1/8 tsp ground cinnamon
2 Tbls olive oil
2 C. peeled and diced acorn squash, butternut squash, sweet potato, or a combination


Couscous:
1 C. couscous
1 Tbls olive oil
1 Tbls diced shallot
3 Tbls diced fennel
1/2 C. dried cranberries, currants, or a combination
pinch of red pepper flakes
1/4 tsp ground cumin
1/4 tsp ground coriander
1/4 tsp sea salt


To make the squash, preheat the oven to 350 degrees.


In a large bowl, mix the cumin, coriander, salt, cinnamon, and olive oil.  Toss the diced squash in the mixture to coat well.  Roast on a rimmed sheet pan for 15 minutes, or until just tender, shaking the pan once so the squash cooks evenly.  Remove from the oven, cool, and set aside.


To make the couscous, combine the couscous and 1 C. boiling water in a large bowl and immediately cover tightly with a lid.  Let it sit for 10-15 minutes, or until the moisture is absorbed.  Place the couscous on a sheet pan and spread it out with a fork, raking several times while cooling to keep the grains from clumping.


While the couscous is cooling, heat the olive oil in a large sauté pan.  Add the shallot and fennel and cook until soft.  Add the dried cranberries, red pepper flakes, cumin, coriander, and salt.  Stir well.


When the couscous has cooled, add the shallot mixture and squash.  Stir well and add a squeeze of lemon juice if desired.


Serve at room temperature.


Serves 4.


As I mentioned above, this recipe lends itself well to your creativity.  Couscous is a nutritious alternative to pasta and rice but if you want even more nutrition use Quinoa instead of couscous.  Quinoa (pronounced "Keen-wah") are edible seeds from an ancient grass.  It originates from South America and was a sacred crop of the Incas.  Quinoa is chock full of essential amino acids, making it a complete protein, one of few in the plant kingdom.  It is also high in fiber, minerals, and it is gluten free.  Kind of a wonder food really!  Quinoa is light and fluffy when cooked and its mild and slightly nutty flavor makes it a healthy substitute for white rice or couscous.  You can find Quinoa readily in any grocery store.  Simply follow the directions on the box to cook and then substitute for the cooked couscous in the recipe above.

Couscous
Red Quinoa


Nuts are a great addition to this dish as well.  You can buy black walnuts and hickory nuts locally from our farmer's markets, or harvest your own.  Pistachios, almonds, and pine nuts also make a great addition.  Be sure to toast the nuts before adding them to your dish for better flavor.

Toasting nuts:  heat dry skillet (skillet should be large enough to accommodate nuts in a single layer) over medium-high heat, add nuts, toast the nuts shaking the pan often to toast evenly.  This takes only a few minutes and the nuts can burn quickly, so do not walk away from the stove while doing this.  When nuts are lightly browned and fragrant remove from heat and skillet to stop cooking.  

Other ideas:  If you don't have shallots you can use onion and garlic.  In the spring try adding asparagus and fresh sauté greens to the mix.  Through the summer use zucchini and summer squashes instead of winter squash and toss in cherry tomatoes.  Try playing with fresh herbs as well.  Fall brings us hearty greens like spinach and kale, leeks, and we start seeing the winter squashes again.  Apples would add a fun sweet tart flavor too.  Don't be afraid to get creative!!  I have occasionally also added some feta or goat cheese and other times a simple vinaigrette.  Vom Fass is a great place to get fun oils and vinegars to brighten up any salad!

If you skipped to the end, here is the important information I was talking about. ;)
Believe it or not our winter farmer's markets are teeming with fresh produce and storage vegetables alike.  Many of our local farmer's now have hoop houses to bring us beautiful spinach and salad greens in the middle of January.  Winter eating in Wisconsin has never been so good!  For those of us who like to grow some of our own food the winter lull is about over and it's time to start our garden planning.  If you are a vegetable or flower gardener don't miss the Garden Expo coming up February 10-12th!  There are experts galore offering their advice and knowledge across a wide range of topics for bargain prices.  If growing your own food just isn't a part of your life, you must consider investing in a CSA.  Most local HMOs now even offer a reimbursement from your health insurance to help cover the cost.   Another jewel of an expo (of sorts) is MACSAC's CSA open house coming up on Sunday, March 18th.  If you have ever been curious about CSAs or are in the market and want to shop your options you should not miss this event!  

I would love to hear what seasonal dishes you are cooking up in your kitchens!  Please post in the comments. :)


Saturday, January 21, 2012

On a Mission

I was recently blessed to be part of a medical mission trip to Mexico.  It was an incredible adventure on many levels... personal, professional, and spiritual.  It was an intense four day excursion with an amazing group of people to do what we could with what we had to bring surgical services to the people of Chiapas (and nearby), Mexico.

Most of our team. Vernon is first lower right.
Our group consisted of three teams of eye surgeons and staff who performed a variety of life changing procedures on children and adults, some of whom traveled as far as 12 hours by bus for the chance to be treated.   Clinica Pena de Horeb (Rock of Horeb Clinic) is a humble facility in Cintalapa, Mexico, where the feeling of a power greater than our own is palpable.  I was nearly moved to tears daily by the incredible work we were able to do with minimal resources and by the sacrifice and appreciation of the people who allow this place to exist and those who came and sat for hours, sometimes a full 24, in the hopes of being seen and treated.  Unfortunately, with each mission campaign there are more patients who arrive than can be treated.  That fact made taking a break and getting a full night of sleep not seem quite so important.  It was a volunteer experience that moved me more than any other and one that I am already looking forward to repeating.

Potential patients waiting in the courtyard
The clinic

The clinic was started in 1991 by Vernon and Grace Odom (a retired couple from Texas) with the help of the non-profit group Good News Friends, Inc. (which they also founded).  I had the pleasure of meeting Vernon on this trip.  He is a quiet and kind Octogenarian who continues to drive from his home in Texas to the clinic in southern Mexico each year.  The clinic has become  known throughout southern Mexico as "the eye clinic" as many medical teams from the U.S. come and do hundreds of eye surgeries each year.


My role on this trip was to provide anesthesia services to some of the children and adults who came for surgery.  Sharing the details of our limited equipment and resources consistently elicits a "wow" and "oh my gosh" from every person with whom I share my story.  We had to think "outside the box" and summon the ingenuity that made McGyver famous.  In comparison, it's clear that we often accomplish so little with so much in the U.S.  The amount of waste in our country in so many facets of our lives is mind boggling.  Especially when you see what you can accomplish with so little at your disposal and to see what so many in this world live without.  I don't really have the words to describe the experience and the impact this trip had on me.  You have to see it for yourself to really understand, and I highly encourage you all to do so.
My anesthesia equipment:  there is no anesthesia machine

Dr. Mark Lucarelli, Jenny Barett RN, and me


One of my intentions for this blog was to show, through my own life adventures, how food connects us with the world.  The clinic has recently added a beautiful kitchen on to their facility in order to feed the volunteers who come there to work.  It is their way of saying "thank you". And it is the best thanks I could ever hope for.  Though we had just a short time to break for meals during our 18 hour days, the love from the kitchen couldn't be denied.  Three lovely women cooked simple homemade southern Mexican cuisine for us every day.  Their work days were nearly as long as ours and they always had smiles for us when it was meal time.

Our "cocineras" hand shredding banana bark for tamale ties
Fresh corn tortillas, salsa verde, fresh papaya, and guava were served with nearly every meal.  Two outdoor wood fired adobe ovens were used on the first day to cook up chickens (no doubt from the grounds) which would be used as our primary source of protein during our stay.  Our meals consisted of scrambled eggs with salsa, empanadas, chiles rellenos, banana leaf tamales, and chicken & black bean tostadas...all made by hand.  (They even hand shredded the dried banana tree bark that was used to tie the tamales!)
Tostada & Banana leaf tamale

Eggs, potatoes, plantains, fruit


Chiles Rellenos, rice, flan
Barbacoa de Pollo


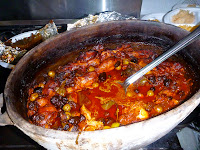
My favorite dish was served at our first lunch.  It was Barbacoa de Pollo and it was delicious!!  I was able to get a list of ingredients from one of our cocineras and subsequently found a similar recipe  online by one of my favorite chefs of Mexican cuisine, Rick Bayless.  Essentially it was chicken legs and thighs stewed for hours in the adobe oven with red wine, red wine vinegar, guajillo and cascabel chilies, dried avocado leaves, garlic, onion, prunes, green olives, cinnamon, and cloves.  I don't see some of these items on chef Bayless's recipe but they really added some fun to the plate and I will add them when I try making this myself.  The meat melted off the bones and the sauce was rich and smoky with a hint of spicy heat.  

When the ladies told me about using Avocado leaves I had to clarify that that is really what they meant.  We were speaking in Spanish after all and perhaps I misunderstood.  As a lover of avocado however, I know full well that "aguacate" is how you say "avocado" in Spanish.  I saw the leaves sitting on the counter and assumed they were some kind of large bay leaf, as that's what they looked like.  I had never heard of cooking with avocado leaves before.  I did a little calling around and found that they can be purchased at some of our local ethnic grocery stores (Yue Wah being one for sure...an adventure in itself!) here in Madison.  

Not only was the food a fun way to connect to the culture in which we found ourselves, but also to the people who live there and to each other.  Our short breaks for meals was the one time during the day when we volunteers could gather in one place to get to know one another, laugh, commiserate, relax, regroup, and reinvigorate.  It allowed us a few short minutes of fresh air as we had to walk outside briefly to get from the operating rooms to the dining room.  It was also a stark reminder of what we were doing and how needed we were.  Our walk to the dining room lead us past the covered courtyard where all of the hopeful potential patients waited (for hours and sometimes days) with empty bellies and dry mouths.  It was a loud and firm reminder to be grateful yet it came in the simplest of ways...a mere few steps taken from one door to another.  Food is so much more than just fuel for our bodies.  It is a bridge that connects us on so many levels to the world around us.

My four short days on this trip were filled with constant simple yet firm reminders to be grateful.  To be grateful that I was born in a country of such abundance, to a family who could offer me so much potential, and who raised me to make the most of that potential. With very few exceptions, we all work hard for what we have, yet we are also so very lucky to have what we have and to be able to work hard for it.  It's so easy to get lost in the constant bombardment of excess in our culture.  I intend to continue to take this trip and take part in other efforts locally to help me maintain my perspective on what is truly important in life.  I can't encourage you enough to find an opportunity to reach out and help someone in need.  It doesn't have to be in another country.  It can be as simple as crossing your street.  You may be blessed in ways you never imagined.
How cute is he?!
New friends with very tired eyes!


P.S. I would be remiss if I didn't tell you that many of the ingredients necessary for the Barbacoa can be found at the winter farmer's market!  Onions, garlic, chicken, and even tortillas! The spices and dried chiles are available at Penzey's and other ingredients can be found at our local ethnic grocery stores.  Food is a bridge between people...don't be intimidated by our ethnic grocery stores, they are exciting places to explore and if you are kind and patient you will likely be treated the same in return.

Thursday, January 5, 2012

Even Mother Nature Loves Bacon!

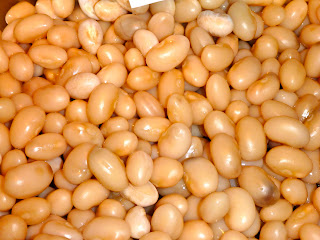
To kick off the new year, I need to take a break from the squash trilogy and tell you about something a little more exciting.  I made a fun food discovery at the East Side Farmer's Market late in the season last year.  (Seems strange to already refer to 2011 as "last year")  Tonight I took a stab at cooking my new found fun and these little morsels lived up to every expectation.  What are these tasty morsels?  Marrow Fat Beans.

Even if you don't like dried beans, how could you not be intrigued by one named after the most decadent part of an animal?  And as if that weren't enough to get you to try them, how about the promise that Mother Nature gave them the flavor of bacon?  Bacon?!  Beans that taste like BACON?!  These adorable snow white beans were definitely coming home with me.  How this wonderful legume ended up nearly extinct is a mystery to me.   Thanks to Slow Food's Ark of Taste and the folks at Sprouting Acres Farm, the Marrow Fat Bean has been saved from vanishing and is available for us to enjoy.

These beans have been soaked, when they are dry they are bright white.


If you're wondering what the Ark of Taste is, please allow me to introduce you.  The Ark of Taste is a modern day Noah's Ark in the food world.  It was created by Slow Food International in 1996 as a way of bringing attention to and preserving foods in danger of extinction thanks to our current monoculture food industry.  It's a really fun and interesting list that I encourage you to check out. (The U.S. even has their own list...US Slow Food Ark of Taste) I also encourage you to consider growing some of these varieties in your own garden and seeking out others to sample when you have the chance.  One of the best ways to encourage and support diversity in our food system is to create a demand by eating said diverse food!

What follows is my first attempt at cooking my special 1 cup bag of Marrow Fat Beans.  My online search for recipe ideas and information about these beans was pretty lack luster.  A recipe from Human Nature inspired the cassoulet I ended up concocting.  Interestingly enough, the Human Nature folks got their beans from Sprouting Acres Farm as well, and their recipe post was inspired by the Eat Local Challenge put on annually by Willy St Co-op (something I strongly encourage you to try when it comes around again in September 2012)

My "recipe" here is a rough guide for sure, and honestly the way I tend to cook.  The only time I follow a recipe to the letter is when I'm baking.

Marrow Fat Bean Cassoulet

1.  Because I hadn't planned ahead, I started by doing the quick soak method with the beans.  Place beans in a saucepan, cover with water, cover pan with a lid, bring to a boil for 5 minutes, remove from heat and let sit for and hour or so.  Rinse beans and cook according to your recipe.


2.  Since the limited information I found online suggested these beans required an overnight soak and a long slow cooking time, I decided to pull out my pressure cooker to speed things up.  I sautéed some sliced onion, rough chopped carrot, and cloves from an entire bulb of garlic (cloves cut in half lengthwise).

3.  Then I added a package of George's Fresh Kielbasa from Willow Creek Farm, sliced in 2 inch sections, and continued to sauté until everything was lightly browned.  (This sausage is fantastic and deserves it's own blog post.  Be sure to follow the link to read more about it!  Willy Street Co-op occasionally carries it in their meat freezer.)


4.  I added the soaked and rinsed beans, some salt, and a sizable dollop of Basil Pistou (thanks to a suggestion from my friend Jan M., I used this method for preserving my summer supply of basil and parsley...brilliant!)   I also added a light sprinkle from each of my jars of Green Bell pepper, Red Bell & Carmen pepper, and celery powders.  A method I used for preserving my some of my summer bounty by dehydrating my garden peppers and celery, then pulverizing to a coarse powder in my food processor.  These powders have been so handy!!


5.  I covered the whole lot with 8 oz vegetable broth and another cup plus of water.  I cooked the cassoulet in my pressure cooker on high for 18 minutes, then released the pressure using the rapid cold water method.

The initial result was a bit of a soupy mess and I was nearly disappointed.  It turns out the beans don't require quite as much cooking as I had anticipated.  I drained the "soup" reserving the solids to a bowl and putting the liquid back in the pan.  After a quick taste I decided the broth needed a bit of wine, so I added a solid glug or two of a dry white wine I keep in my fridge for cooking.  I brought the liquid to a boil and cooked it uncovered until it was reduced to a nice thick sauce.  I added the sauce back to the solids and voila...dinner was ready!!


The result was a delicious, creamy, soul warming cassoulet with wonderful bursts of flavor from the now fork tender kielbasa.  Now for the million dollar question...did the beans taste like bacon?  I wouldn't say they have the forceful taste of bacon, but they do have a wonderfully distinctive and delicate flavor of smoky ham.  A description of the beans I found suggests they lend themselves well to being pureed.  These beans are definitely the creamiest I've ever tasted.  A piece of crusty sourdough toast and a glass of beer made this a dinner to definitely make again!!

Happy 2012 to you all!!